I'm really glad that lot of people asked about my figures lately, but some of them really got surprised when they heard the prices. Obviously these are not mass produced products made by machines in the thousands. These are custom made, and the price reflects that. heh. so I felt that I needed to explain the amount work that is behind the production of a figure better. Some 3D printing enthusiasts also wrote me too, before, asking about the process for educational purposes, so I'll use this chance to explain with more detail how the work is done.
as you may know, the figures i produce are 3D printed. but 3D printing something is not like printing a photo on a home printer. For starters, you need a 3D model that you want to print. i use Zbrush to model the figures. i think Zbrush is the best program to use for characters and organic stuff... if you want to model a car or other structures there are better programs, like Maya or blender. but for characters, Zbrush is the best option (at least for me). Modeling in Zbrush is like working with clay. You don't need to worry about faces, vertexes, planes, ect. instead, it is much more like real sculpting, especially with a pen tablet, since the pressure sensitivity makes the process feel much more lifelike.
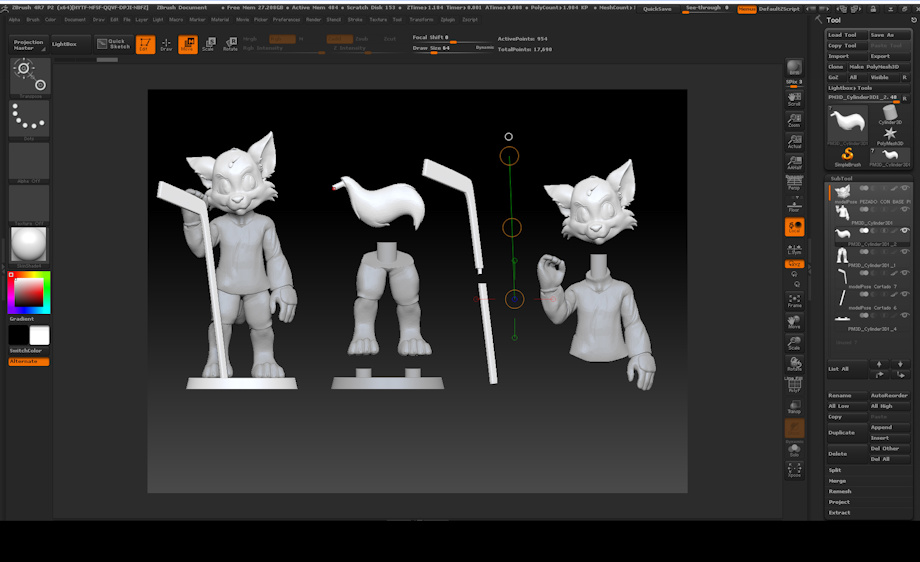
The modeling of this figure took 16 hours (that's the average). The model looks good for rendering and other purposes (like animation) but before you can print the model it needs to have prep work done.
the first step is to plan how the model will be printed. most printers don't have enough print volume to print large models (and in general it is not a good idea to print the whole model in a single block because there are areas that will be hard for the printer to create without using a lot of support material (I'll talk about this later) to make it short, you don't want a lot of support material). so we divide the model into pieces. another benefit of this is that it makes painting the figure much easier by allowing us to paint areas that would otherwise be difficult to reach.
Now, you cant just cut it into random parts, you have to think about where you place your cuts. you do not want to leave cuts visible on the finished statue, so you need to place these separations in natural seams in the model, or other places where they will not show.
this is also the time to modify the model for printing. some details look great in 3D, but arnt possible to print, such as individual hairs. in the case of this figure, the whiskers and nails are too think and small. the printer will try to print them, but these details will likely break off when you separate the model from the support material, or be so thin that they fail before even that. clothing is another example of something that will need to be altered. normally in a model for rendering, the clothing is a thin layer (well, like actual cloth) but for printing you need to make clothing a solid block, and merge it with the body. for this piece, the hockey stick was made thicker than the render model, because we do not want it to break easily once the model is finished and in the hands of the customer.
finally, you will notice that the model is not just split, but parts have had pegs added to them, along with matching holes on the opposite parts. not only do these pegs allow for a loose fit of the pieces together, but they create a stronger bond once everything is glued together (we attach the parts together with super glue at the end of the process)
so, there's heavy editing work between finishing the 3D model for rendering purposes, and printing the model. this editing work alone was an extra 6 hours of work, on top of the 16 hour modeling time.
Keywords
male
1,260,511,
wolf
201,653,
3d
22,631,
figure
2,308,
sculpture
1,123,
tutorial
605,
printing
38
Details
Published:
9 years ago
18 Feb 2017 16:22 CET
Initial: b713468886ae26812e63387868205b54
Full Size: b23b7a5f6f7515e80c2491147309acb3
Large: 165805fda340de6146ba1102cd5ef528
Small: 64e3eb92e2e7b30e8538a0e919ecaa9d
Stats
774 views
28 favorites
7 comments
