Wow, I've been quiet about my puppet project for a while, mainly because I suffered a major setback.
My main eye assembly worked fine by hand, but had a bit too much flex once I added the springs and cables, leaving me to wonder about its durability. As I may have mentioned before, virtually no glue will stick to polypropylene plastic, so you have to heat weld parts together. I attempted to reinforce the backplate and add fins to help mount it to the head, but the heat from my soldering gun warped the plastic. The eyes don't operate smoothly anymore. Arg. Looking back, it was a pretty stupid design, so... on to eyes version 2.0.
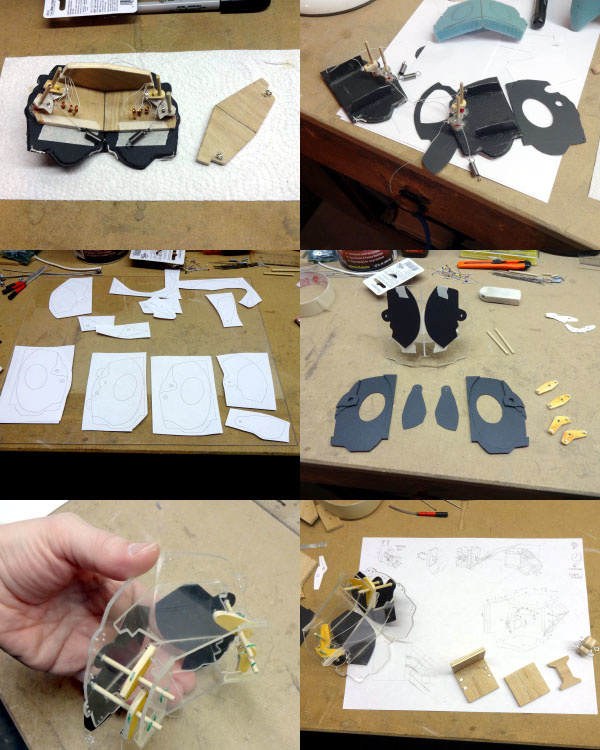
The new eye assembly is an entirely new and fully engineered design, made of acrylic, which will be very durable and glues will stick to it.
The cable control box is a rather complex shape but the thread routing is much simpler than the old design. I'm using bicycle shifter cable to control the eyes, but the shutters are operated by upholsterer's cord. Keeping the routing simple will cut down on thread wear, though I'll probably still have to disassemble it every few months for maintenance. This new design is easier to maintain than the old one, too, as none of the rockers are glued to the shutter rods.
Image 2, panel 3 shows the final assembly, with springs, adjustment screws, and of course the two shifter cables. Once I construct Wac's body, I'll determine how long the cables need to be and how to build the pushbutton inverter.
A while ago I already constructed the muzzle assembly with an elastic grip. It's designed specifically for my hand and stubby fingers, so I doubt anyone else could operate this thing. Now that the eye assembly is finished (as of yesterday), I can finally mount the eyes into the head and start putting the muzzle in its final position. Then, on to the fabric covering! The eyes took forever to construct, but the rest of the head should go quickly. I really want to get this done by January, so I have time to practice my performance and video editing. There's a special event happening at the end of January that I want to use as a subject for one of my first videos, so... no more slacking. It's time to get this thing assembled!
Keywords
male
1,284,740,
raccoon
38,972,
model
3,322,
sculpture
1,129,
puppet
960,
construction
937,
tutorial
598,
foam
299,
waccoon
139
Details
Type:
Photography - Fursuit/Sculpture/Jewelry/etc
Published:
8 years, 6 months ago
11 Dec 2017 14:09 CET
Initial: be5b269db19a64152e1c8ed9a5cff911
Full Size: bd46e9d256cf9bf103b049642ab53e7b
Large: f3e45f542c5444c7acdc2bd2fcdb5dd9
Small: 3cf7e700bd9d8a266b9d549e1e870348
Stats
60 views
3 favorites
0 comments


")