The Low Budget Traditional Art Tutorial
Yure T. Kitten
Index.
Introduction. 3
Resources. 4
On Not Using Two Sheets per Drawing. 5
The Ink and It's Problems. 10
Color. 12
Tiled coloring. 13
Shading with Colored Pencils. 16
Conclusion. 18
Introduction.
“Traditional art is not easy, it isn't cheap either.” Maybe it's hard, yes, but it can be cheap. You don't need to pull a whole lot of money to do a nice-looking picture with soul and beauty or, at least, cuteness and innocence.
The purpose of this document is to show how to do traditional art under the restraints imposed by R$20,00. It isn't a tutorial on how to draw from scratch, I mean, it won't teach you to draw from zero. It assumes you already know traditional art techniques and will just teach you to fit your skills into the restraints. However, even if you don't know how to draw just yet, this document might give you a direction or a light.
One might ask why not just start doing digital art, as there are free programs to do such thing. First, not everyone likes the digital art look and feel. Second, not everyone can have a PC. If you sum up the costs of the hardware needed to run a digital painting program, essentially, a modern PC, you will have a cost that might exceed R$1000,00. Art is supposed to be for everyone, despite their monetary condition.
On the first part, Resources, you will find what to buy with R$20,00, if you were a jobless Brazilian kid who just started taking art classes.
The second part, On Not Using Two Sheets per Drawing, explains the importance, to low budget art, to use a single sheet for multiple drawings.
The third part, The Ink and It's Problems, explains the use and abuse of pen ink, the champion in the “ruining paper sheets” category.
The fourth part, Color, ponders over the proper way to color a drawing using colored pencils, the cheapest coloring tool with a considerable degree of decency.
The last part, Shading with Colored Pencils, will give a few tips on how to shade something with colored pencils, duh!
Resources.
Here, you see my tools. There's a lot of repeated stuff there, pencils from many copies of the same set, for example, and many pens with the same color. I do that for a variety of reasons, but you don't need to buy four boxes of the very same twelve pencils at all. Essentially, taking away the repetition, what we have here is:
1. A B-sized drawing pencil (R$2,00). You can replace it with a common number two pencil, there's not much difference.
2. A set of Faber Castell colored pencils (R$10,00). The set can be replaced with a cheap one of around R$3,00, though. The reason why I use the ones from Faber Castell is that I'm colorblind and the pencils come with labels on them, so I know when I'm using blue to color the sea, instead of, lets say, violet. If you don't have a problem like mine, there's not a lot of reason to pick specific brands. Do not buy sets that are cheaper than R$3,00.
3. An eraser (R$0,50).
4. Pen (R$1,50). I got the pen we are going to use in a bus, from a seller who offered the pen and some candy for R$2,00. There are pens that cost R$0,60, though.
5. Pencil sharpener (R$1,00).
Aside of those recurring tools, there's the paper, obviously. A sheet costs R$0,50, but I have drawn on pamphlets I got for free on the streets.
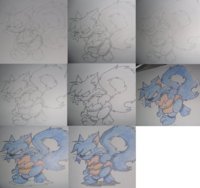
On Not Using Two Sheets per Drawing.
Get your pencil and sharpen it. Don't over-sharp it, just enough to have a good pencil tip to work with. You won't re-sharp the pencil unless you break the tip, otherwise you will soon need another pencil. Now, in professional traditional art, you usually use two sheets per drawing. Sad, but true, you do the skeleton in one sheet and then cover it with another sheet, lining over the skeleton. Both sheets are supposed to be put over a glass table of container with glass surface with a light bulb sending light through the glass, so the lining would be easier.
Electricity costs money, so does glass, and that's a lot of money for what we are going to draw. Plus, using two sheets that won't be reused after sounds like a waste.
In low budget art, a sheet must endure. You gotta make it last. To do so, you will bend the paper. Yes, that's right. By bending the paper, you will divide the space in the sheet. For example: bending the sheet in the middle, you divide it in upper half and lower half. Two drawings on the same side of the sheet, two drawings on the other side, four drawings in a single sheet. There's a trade-off, of course, as the lines of the other drawing will be revealed during the coloring of a drawing that is done on the back of the sheet, but it isn't something too harsh most of the times.
I have bent my sheets three times for years, making every sheet hold sixteen drawings, but I decided to bend the sheet only once for this drawing. After all, you are just starting.
Now, draw the skeleton. This tutorial supposes that you know traditional art techniques, but, if you don't, a skeleton is a bunch of forms, simple shapes, that define the basic anatomy of a character and general characteristics of a background (backgrounds also have skeletons!).
The skeleton is done with the pencil. It doesn't matter much if the pencil is well-sharpened, as the pencil is there just to help and won't shine in the final product. Do it with a soft hand... If you apply too much strength, it will be hard to erase later. Plus, using too much strength will make pressure lines on the other side of the sheet, influencing what you will draw there.
After making the skeleton, draw the details on it, to make the character have it's fundamental characteristics. The fail cartoon cat we are going to draw is made mostly out of stacked spheres. Then, we add it's details, such as bushy tail, a chubby belly, eyes and a diaper. Sue me.
Now, line, still with the pencil, the parts that matter for the drawing. You will line his arms, his tail, his legs and such. Of course, you don't need to draw what I'm drawing, but can apply what you are learning to your own style right away by doing a picture following these steps. It doesn't need to be a padded kitty.
To do the lines over the details, you will need to use a little more strength than you used to make the skeleton. Remember, you aren't allowed to re-sharp the pencil unless you break the tip, understood?
Now, onto the eraser. Grab your eraser and run it softly over the drawing, in a way that it erases the lines of the skeleton, but leaves behind the lines of the details and the shape. This way, we will have... a blurry drawing, yes. But you will gonna line it again with your pencil.
One might ask, however, why not use the pen to re-line the drawing, so you could skip the pencil part. Because, if you make a mistake in this stage with your pen ink, you won't be able to erase it or revert the damage.
Plus, because you are doing it with pencil, if you notice that you made a mistake in the skeleton that ended up affecting the definitive shape, you can always erase it. As you master your techniques, the use of the eraser will become less and less common, so you won't need to care much about buying another eraser.
And now we will ink! No need to use two paper sheets!
The Ink and It's Problems.
Now, get your pen. Line softly over the drawing, emboldening the pencil lines with the ink. Now, this is tricky: you are recommended to do that from top left corner to bottom right corner. If you are left-handed, do that from top right corner to bottom left corner. This way, the risk of your hand rubbing against an inked part is smaller. If it rubs, maybe you make mess.
Some art teachers like to say that you aren't supposed to adjust the paper on the table, that the paper must stay still, but you can do that if it's needed to reduce the risk of staining the paper.
To avoid making pressure marks on the paper you will reuse, do not apply a lot of strength. Pens that use a lot of ink per stroke, like the ones from Bic, are perfect, because the lines will be bold with little pressure. But pens that are too expensive tend to use too much ink and it can be bad if you are in a hurry to finish the drawing: the more ink you use, the higher are the chances of needing to let the ink dry before coloring.
If you feel like you used too much ink, do not color right away. If you do, you will make a mess.
Mistakes happen, however! If it's little, continue the drawing; the coloring and the shading most likely will make the mistake unnoticeable, so you won't need to trash the drawing, which would waste paper.
Color.
Get your color pencil ready. Give smooth, light strokes with it on the part you want to color. Sometimes, if you feel it will look better, color in a circle motion instead of a stroking motion. Up to you. But in every case, don't color with a lot of strength; it better to use a gradual increase to reach the perfect amount of color than using a lot of color, noticing that you used too much and then be frustrated with the result.
Tiled coloring.
Color small areas, instead of attempting to color, lets say, the head of a character all at once. When coloring, follow these steps:
1. Chose the area (tile) you want to color.
2. Color it bit by bit.
3. When you color a small part of the area and decide to color the other, do not color the next part independently, instead move the pencil over the new area and over the area you already colored, back and forth, to make it look more homogeneous. This is a trick to make it look homogeneous without a lot of work.
If you color each small part independently, an observer might notice the “tiles” in the coloring, lines that give away that you colored it bit by bit instead of making a whole homogeneous coloring. A lot of people are displeased with such realization, as tiled coloring is “cheating”.
Shading with Colored Pencils.
Delimit the area you want to shade using the color you used to color that part. For example, if you want to shade a blue structure, you will delimit the area to shade using a blue pencil. If the surface you want to color is white, use a black pencil to delimit the area you want to shade. Then, shade the delimited area using the same pencil you used to color said area.
Get the black pencil and, with a soft hand, apply a layer of black color over the shading you just did.
Conclusion.
Was it hard? Yes, but cheap. I have given you alternatives to the tools, so you can replace them with even cheaper tools that work. But, as long you have fun and as long the drawing looks good in the end, you are doing it right. Art is a matter of bringing good feelings to the person who is receiving the art and being relaxing for the artist, a way to express the good and the bad feelings he is experiencing, a necessary expiration for the inspiration he received, like breathing.
You don't need great tools to do that. It doesn't need to be drawing either; it can be writing, it can be music. As long you take pleasure in producing art and as long it gives pleasure to a viewer, you are doing it right.


")