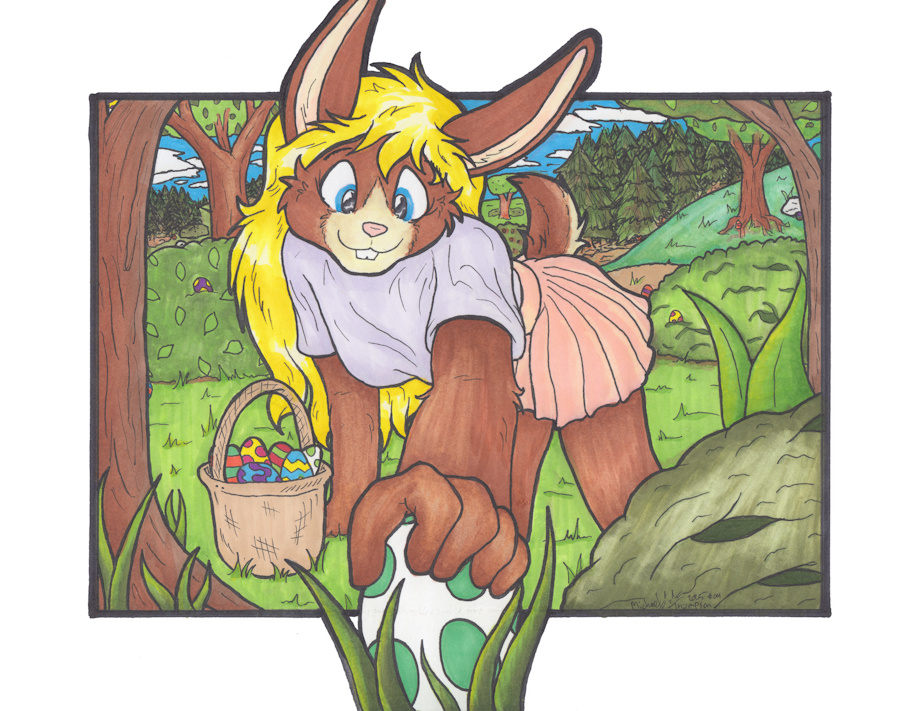
Hello all.
It has been a long whiles since I did a Tutorial on How to Draw so I thought I would do up one for Easter. I will take you all through the various processes I go through to sketch out, ink, then colour my drawings. I hope those who are curious on how I do things, or are looking to learn more on how to draw, especially with Traditional Medium, that this is informative.
Steps 1 and 2:
These two are linked since its pretty much the same process but intellectualized.
I should actually start by saying there was a planning stage, a STEP ZERO as it were. I new I wanted to draw Petra, my Easter Bunny I created for a contest hosted by Lavender Panda, many years ago.
In Step 1, I started off with a simple concept, but it grew on me. The initial sketch went well, but I was thinking I would orientate this vertically, but I was not sure.
For Step 2, I redrew this on a clean sheet of paper, and added some more basic ideas. I grew the BackGround, and added more to the ForeGround, a few more concepts added. I liked this and decided to go forward with it.
Step 3:
After taking the redraw from Step 2, I took that and traced it over onto a clean sheet of cardstock. From there I added more details, making some adjustments, moving a few lines, adding more details. I used my ruler to add a boarder, marking off where I want to draw, and having Petra spill out over the edge to add depth.
This is the final pencil sketch, from here I will ink this.
Step 4:
In step 4, I have started inking. I have the basic lines in place, and the boarder put in. Around the board, i used a Sharpie to add some thickness, and set up for colouring I accidentally put a thin line through the egg in the foreground, and had to cut/scrape it away with my Xacto blade. Pencil marks remain just as a reminder of how things go and just in case I want to add anything more.
Step 5
Fully ink. I touched up the basket and added line thickness to everything, hoping to add more depth. Extra details added in, a few extra details. I went over the boarder again with a Sharpie.
Next I erase all remaining pencil marks that are left, being sure to pull the eraser in one direction instead of a constant back and froth motion, which could cause the sheet to bunch up or rip. (I might do a separate tutorial on how to erase at some point.)
After erasing, I go over things again, touching up any lines that were faded from the eraser and thinking up a few more divisions of one object from another. A few minor mistakes are covered up as well, which is a nice thing about added line heft. Heh heh.
Step 6:
I have started the colouring. I am using PRISMA COLOR markers, as I have come to really enjoy them, plus, at the time they were really affordable. Unfortunately, my markers are starting to dry up so I get some strange effect, and the some of the shades I wanted to use were completely dead.
Here you can see how I like to layer and combine a few colours, especially on the right side on the plant leafs standing up behind the bush..
Part 7:
Final, seen at the very begining. Here we have Petra Cottontail making an Easter Delivery, hiding an egg for some cleaver young boy or girl to find.
I have coloured everything, and then gone over some of the lines again, thickening them up, hiding a few smudges and bleeding effects from the markers. A few extra touch ups are added here and there, some minor shadowing to go with some minor highlighting.
Once scanned in, i did a very minor touch up on her left cheek, and I used the wand tool the blank out the boarder space, making it crisp and void, to help the picture and Petra stand out.
=^.,.^=
Keywords
female
1,147,304,
rabbit
147,083,
bunny
117,976,
traditional art
8,876,
blonde
6,318,
egg
6,132,
easter
4,234,
basket
709,
tutorial
605,
easterbunny
112
Details
Published:
10 months ago
22 Apr 2025 12:15 CEST
Initial: 4ada609e9170b9611da911cd9c7c84a4
Full Size: f941fdaf0ea39e9a6211988876892224
Large: 9d3b87d9338bd3439ff349baf0b0b720
Small: fac6024bf3edbdf8673c37427acf2ab1
Stats
54 views
7 favorites
0 comments
