Welcome to Inkbunny...
Allowed ratings
To view member-only content, create an account. ( Hide )
Dragon Farmer
« older newer »
Logically
Logically's Gallery (96)

SD & A1111 Tutorial 1: Basic Overview

SD & A1111 Tutorial 2: Prompt & Parameter Tuning
start previous 6 of 11 next end

Medium (920px wide max)
Wide - use max window width - scroll to see page ⇅
Fit all of image in window
set default image size: small | medium | wide
Download (new tab)
page 1
page 2
page 3
page 4
page 5
page 6
page 7
page 8
page 9
page 10
page 11
First in pool
SD & A1111 Tutorial 2: Prompt & Parameter Tuning
+15
Stable Diffusion and Automatic1111 Tutorial Series (journal link)

Covered in this tutorial

• Some basic info about Stable Diffusion (SD) and (A1111), including terminology and setup info
• My default A1111 settings and an overview of my work process
• Steps on how to reproduce a sample render
• At the bottom, there are some misc tips that I would encourage people of all skill levels to take a look

I appreciate any and all feedback, including things I missed, things that are incorrect, or things that could be explained better. Private or public message is fine.

Common terminology

There are a lot of resources out there that go into way more detail than I can fit here. But I want to at least mention the terms that you should be familiar with.

• Stable Diffusion (or SD) – A generative AI model that generates images from text
• Automatic1111 (or A1111) – A web browser based user interface for creating and executing Stable Diffusion Prompts
• model – Represented as a 2+ GB file, a trained set of weights that determines how Stable Diffusion will handle prompts and the general art style it produces. (This is very hard to describe succinctly, please do look up better explanations)
• prompt – The text input into Stable Diffusion, represented as a separate positive prompt and negative prompt to control what to include and exclude from the render

Less important
• CivitAI – A website that serves models and LoRAs for download. I get all my resources from here. https://civitai.com
• LoRA (low-rank adaption) – You can think of these as mini-models, or add-ons to a main model that instruct Stable Diffusion about a specific concept; usually a character, art style, object, or pose.
• prompt weight – Any keyword/phrase in your prompt can be given a weight or strength number to affect its influence on the prompt. 1.0 is default and can be changed like (keyword:1.2) or (keyword:0.8) or (keyword)+ or (keyword)-. I always use numbers instead of +/-.
• txt2img – The mode of Stable Diffusion that transforms text prompts into images
• img2img – Another mode where you can also include an image as part of the input
• upscaling – Process of generating higher resolution images by passing a lower res render through img2img.
• Highres fix – Feature of A1111 that does upscaling by generating a txt2txt image and immediately passing that result to img2img.
• X/Y/Z plot – The name of a script in the “Script” dropdown menu of A1111. I use this heavily for generating upscales of a selected set of seeds.
• embedding (or textual inversion) – A small file that instructs a model how to respond to a specific keyword in the prompt. I am avoiding using these in these tutorials to make things easier.
• ControlNet – A plugin for A1111 that provides many powerful controls over how the image is rendered. Future tutorials planned to cover this.
• Latent Couple – A plugin for A1111 that allows user to generate separate prompts for different parts of the image. Useful for creating multiple characters. Future tutorials planned to cover this.
 
On setting up Stable Diffusion and Automatic1111

There are lots of resources on this that will be better than I can write. I did this a year ago and maybe the details are all different. But a very basic summary involves installing Python 3.10.6 or higher and Git, installing A1111 through GitHub, and downloading a Stable Diffusion model.

https://stable-diffusion-art.com/install-windows/
This is an example guide I just found by googling. I looked through and it seems accurate and comprehensive. But I didn’t follow this specific guide myself, so I can’t guarantee if its all accurate. There are tons of other tutorials, so it may be worth looking around.

That guide mentions “xformers” as a step. I do remember that xformers was a thing I enabled that resulted in noticeably faster renders.

My specs

Unfortunately, the ability to run SD and A1111 locally has some computer requirements. Mainly, you need a computer with Windows 10 or higher and a graphics card with (supposedly) at least 4GB.

I’m on Windows 11 and my graphics card is a GeForce RTX 4070 Ti 12GB. This is not quite top-of-the-line but it is a very good card and has been more than suitable for my purposes. If you are getting a graphics card for this purpose, do a lot of research on the newest cards and how they perform. You can get away with a less powerful card. You will just have longer render times and you won’t be able to upscale as much.

I am on A1111 v1.9.4, which is the current version, at time of writing.

Tutorial Steps

The first half of this section is just a basic test that your setup can reproduce my render. Otherwise, any other tutorials in this series will be much harder to follow. These steps assume you have SD and A1111 set up and you are able to at least run it and open the UI, but are unfamiliar with the UI.

For the initial render

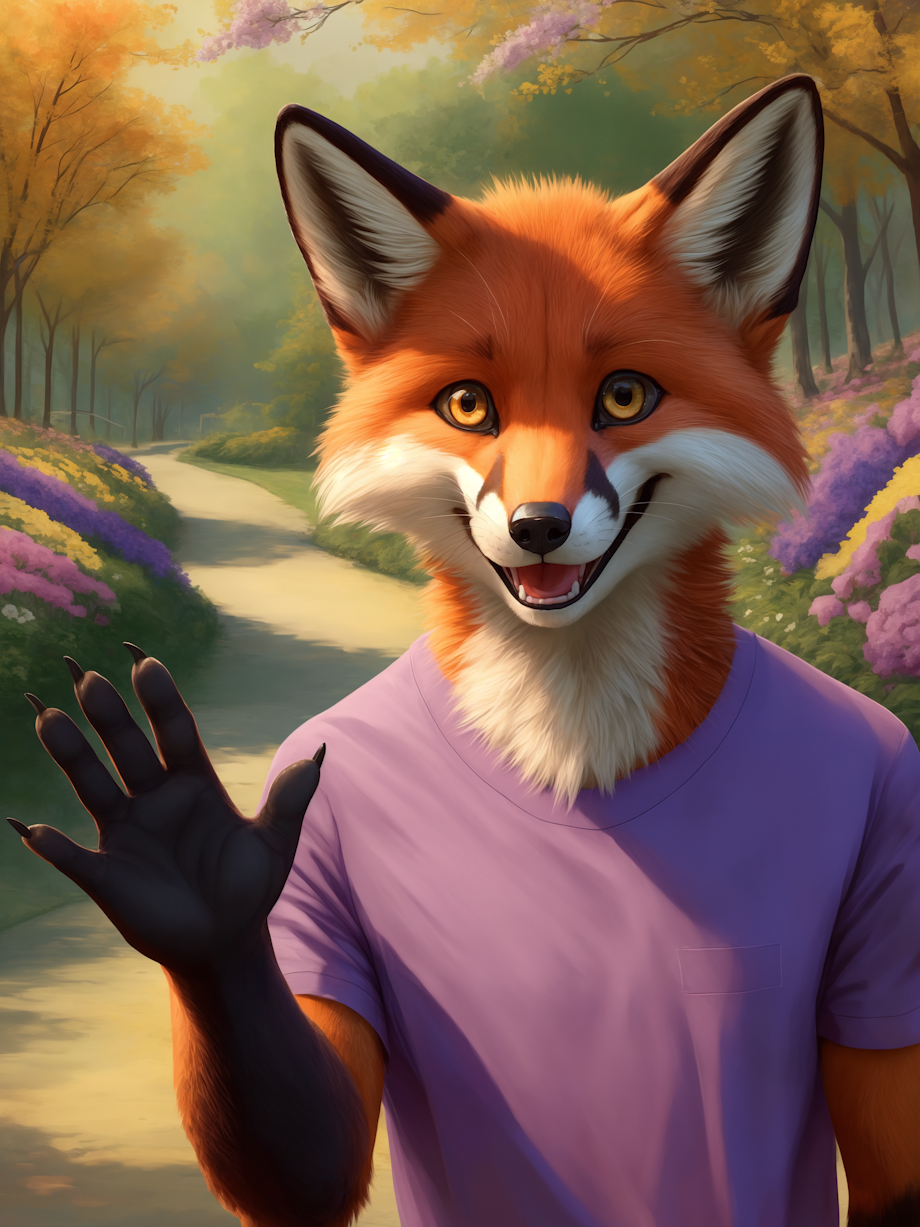
• If you haven’t already, download the 1.99GB model “Indigo Furry mix” v120_hybrid. Save it to this folder which should be in your SD directory: “stable-diffusion-webui/models/Stable-diffusion”.
https://civitai.com/models/34469?modelVersionId=397050
• Run your A1111 server and open the web UI. Go to the “txt2img” tab. Check that you have the correct model selected on the top-left dropdown “Stable Diffusion checkpoint”.
• Copy the positive and negative prompts below into the 2 large text boxes.
• Modify your render settings to match mine in image [2A] (mainly Sampling method, Sampling steps, Width, Height, CFG).
• Start the render by clicking “Generate” or Ctrl+Enter. The first render may take a few seconds to warm up but after that it should be faster.
• Open your output folder by clicking the folder icon on the right side below the render preview. It should be “stable-diffusion-webui/outputs/txt2img-images/[YYYY-MM-DD]
• Download image [1A] and compare it to your result. Hopefully, it should be exactly the same. SD has been known to produce slightly results for any number of reasons, which sometimes cannot be explained. If yours looks like 99% the same, that might be good enough.

Positive prompt (copypaste this)
"
male fox, furry, (solo:1.1), short sleeve purple shirt, (waving:1.1), laughing, cute, happy, yellow eyes, black hands, black claws,
public park, (green trees:1.1), spring, (flowers:1.1), (pathway:1.1),
front view, closeup, (looking at viewer:1.1), masterpiece, high quality, realistic, detailed background,

Negative prompt (copypaste this)
"
bad quality, deformity, person in background, (lamp post:0.8),

Settings (must be configured individually; compare to image 2A)
"
Steps: 30, Sampler: Euler a, Schedule type: Automatic, CFG scale: 7, Seed: 0, Size: 600x800, Model hash: b965aee5a3, Model: indigoFurryMix_v120Hybrid, Downcast alphas_cumprod: True, Version: v1.9.4


If you want to try upscaling

• Check the “Hires. fix” option.
• Modify your render settings to match mine in [2B], except “Upscale by”.
• For “Upscale by”, you can use any multiplier you want.
I would strongly suggest starting with 2x or lower and going up from there. There is a limit to how much your graphics card can upscale, and you won’t know what that is starting out. When you approach this limit, things start breaking. Either the render times will get extremely long or the render will just fail with a “CUDA out of memory” error.
• Generate your render. This feature will generate the normal low-res render first then feed that into img2img with the same prompt/settings. Upscaling like this typically gets WAY better results than just setting width/height to larger numbers. See image [3] to see how badly this can go. The deal is that SD is not good with 1000+ resolution without upscaling.

(Beyond this point, there are not sample images upload to reproduce. You can just try these on your own.)

If you want to try batching many seeds

• I would suggest turning off upscaling for batching. When I do batching, I just want to see how well different seeds behave, which is easy to determine at low resolution.
• “Batch count” and “Batch size” settings are your batching controls.
• “Batch size” is how many seeds will be rendered at the same time. The optimal “Batch size” I think will depend on your graphics card. At first, just use 1; but you can experiment with 2, 4, or 8 to see if you get faster per-image times. I personally use 2; anything larger starts to become slower per-image.
• “Batch count” is what it sounds like. Just make it bigger than 1 unless you’re doing a large batch size. Just be careful of doing too many batches since you’ll have to wait for each batch to finish. Maybe start with like 2 to 5.

If you want to try upscaling some selected seeds

• Again, I would advise against using batching for upscaling. You can do it, but you’ll spend way too much time waiting. Instead, use “X/Y/Z plot”.
• From some batches of non-upscaled renders, look through them and select some of your favorite seed numbers (this is where it really helps to have small seed numbers)
• In A1111, select “X/Y/Z plot” from the “Script” dropdown at the bottom.
• Set “X type” to “Seed”. Leave the others as “Nothing”.
• Set “X values” to a comma separated list of your selected seed numbers, like “4,8,15,16,23,42” (without quotes). Don't leave a trailing comma.
IMPORTANT: Double check that both Batch count/size are set to 1. Otherwise, you’ll end up generating way more images than you asked for. I can’t tell you how many times I’ve messed this up.
• Set up your upscaling settings as before, and Generate.
• So this will generate a single grid image at the end in “txt2img-grids”; I don’t really care about that. This happens to also generate the individual images in “txt2img-images” as normal; those are the ones I actually look at.

My default settings

These are just my settings in A1111. I strongly suggest that you experiment with a lot of these and see what works the best for you. I will probably go into more detail about settings in a future tutorial.

• Sampling Steps – 30. I’ve seen people go as low as 20 and as high as 100. This linearly affects how long renders take, so if you can get away with lower, it is faster.
• Sampling Method – Euler a. There are a lot of options here. I just settled on this at some point and never changed it. Some produce different results but also cause different render times.
• Resolution – This depends on the scene, but for initial renders typically 600x800, 800x600, or 800x800.
• Highres upscale – I typically use a 2.56x multi to upscale to 1536x2048 (or flipped). If I’m feeling daring, I’ll go as high as 3x, but only after a successful 2.56x. My setup can go higher, but personally, its usually not worth it.
• Seed – When starting a new render, I always start at seed 0, usually stay within seeds 0-20, and almost always stay within 0-100. I never randomize seed. My personal philosophy is that if you can’t get a good result in 10-20 seeds, the prompt needs work.
• CFG Scale – 7. I might go down to 5 or up to 9, but 7 has been the most consistent to me.
• Model – There are tons of models out there that cover different styles from realistic to anime to furry. My default model has been Indigo Furry Mix, which the v120_hybrid version is the one used in this tutorial series. There are many other popular furry models, which should be included in the prompt info for any AI render on Inkbunny.

Overview of my process

This is just my basic process for turning an idea into a render, assuming it is simple enough to  do without additional plugins like ControlNet. This typically means it is a solo character doing a generic or common pose. When adding things like ControlNet or Latent Couple, this changes things somewhat.

• When starting a new render, I always start at seed 0. I never randomize seeds and I almost always stay within seeds 0-99. This makes it easier to keep things organized.
• Iterate on prompt until it can’t be improved. Basically just: small prompt change, render, evaluate, and repeat. Doing this a lot, you start to understand how the model behaves to certain keywords and prompt weights.
• Once the prompt stops improving, generate a batch of images. I typically generate 10 or 20. Pick best one and go back to previous step for further iteration.
• When initial render is good enough, do an upscale of 2x or 2.56x (depends on how confident I am in the prompt). Higher upscales take longer and are more likely to mess up. If I’m confident enough, I might upscale to 3x.
• From here, I might also generate several upscaled images. I first generate a larger low res batch of maybe 20-30 renders, pick a few good seeds (maybe around 5-10 of them) and upscale just those best seeds using the X/Y/Z plot script.

As a challenge to myself, I tried to see how fast I could run through this process for a new idea from scratch. I was able to end up with a fairly okay upscaled render in about 5-10 minutes, including render times. That amount of time doesn't make something good enough result that I would post it, but I can at least explore and iterate on different ideas quickly without much time investment (or just for my own fun).

My Inkbunny posts usually take me around 5-10 hours per post, averaging around 7-8. Most of this time is spent either tuning prompts, editing (photoshopping) in GIMP, or making supplementary artifacts like OpenPose poses and Latent Couple masks.

Render times

These are some time trials for my renders using the settings for this image. You might understandably assume that render times scale linearly with the number of pixels. In reality, it is usually worse than linear, so the more pixels you render, the more time is spent per-pixel.

However, 3.8x was faster than 3.6x and I have no idea why. I thought of removing this data point for simplicity, but I'm leaving it in. Sometimes, this technology does weird unexplainable things.

render time - upscale multi - resolution - render time seconds per megapixel (low is fast)
• 0:03 – initial – 600x800 - 6.25
• 0:27 – 2x – 1200x1600 - 14.06
• 1:00 – 2.56x – 1536x2048 - 19.07
• 1:29 – 2.8x – 1680x2240 - 23.65
• 1:51 – 3x – 1800x2400 - 25.69
• 2:26 – 3.2x – 1920x2560 - 29.70
• 3:20 – 3.4x – 2040x2720 - 36.04
• 4:53 – 3.6x – 2160x2880 - 47.10
• 4:37 – 3.8x – 2280x3040 - 39.96

My setup fails with at 4x with a “CUDA out of memory” error. With more advanced plugins like ControlNet and Latent Couple, I have seen renders of an individual image take 30+ minutes caused by upscaling too much.

Miscellaneous tips

• Upscaling higher is not always worth it, even if your system can handle it. You can look through all the upscales on this post and judge for yourself. Beyond maybe 2.56x or 3x, I think the higher upscales are not necessarily better. Also, upscaling higher increases I feel makes the render more likely to have visual issues.

• You can change the file name format from renders. In A1111: "Settings", "Saving images/grids", "Images file pattern". I strongly suggest you change this from default to something that helps you keep everything organized. This wiki describes the options for naming.
https://github.com/AUTOMATIC1111/stable-diffusion-webui...
My personal setting is “[datetime]_[prompt_hash]_[width]_[seed]”, example: “20240608200025_4db83745_1536_0.png”. The filenames are kinda long, but it’s worth it. “datetime” keeps everything sorted chronologically without having to change sorting method. “prompt_hash”, so I can identify all renders that had the same prompt without looking at them. “width”, so I can tell which ones are upscaled. “seed”, because this is just good to know. I'm not prescribing you use my format, but to tailor it to your needs.

• For anyone that uses random seeds or large seed numbers, I encourage you to try using smaller seed numbers and starting at seed 0. It really makes things a lot easier to manage.

• In A1111, you can overwrite the default values used in any field. There’s a top level file “ui-config.json” in the SD folder that you can edit to change the defaults. It’s kind of a large file, but its easy to find the setting you want to change. Make a copy of this file before you mess with it, though.

• You can add a file “notification.mp3” to your top level SD folder that will play when your render is done. I’ve included my personal sound file as [4]. Feel free to use it.

• I use the "XnView MP" image viewer, because I was having problems with the default Windows image viewer. https://www.xnview.com

• I will probably talk about this in a future tutorial, but e621 is a great source for finding the correct words to put into prompts. If you are looking for a specific concept but don’t know the specific phrase, make sure it is a common e621 search term.

Keywords
male 1,169,028, fox 243,289, ai generated 18,249, stable diffusion 4,236, park 4,215, automatic1111 1,376, tutorial 607, tutorials 88
Details
Type: Picture Series
Published: 5 months ago
Rating: General

MD5 Hash for Page 6... Show Find Identical Posts [?]
Stats
659 views
35 favorites
3 comments

BBCode Tags Show [?]
 
SomeAIArtist
5 months ago
👍❤️
lutra1975
5 months ago
Thanks for sharing!
katoga
1 day, 4 hrs ago
I have a silly question ^^
I'm working on CivitAi Online so no much control what i can create.
Where i can get that "Stable Diffusion checkpoint" program.
Everywhere is about lodels tutorial how to use it.
New Comment:
Move reply box to top
Log in or create an account to comment.