This is a summary of the techniques I use to draw. I made this because one person approached me wanting to learn how to draw. I find it easier to give them a tutorial. This might be useful for others.
1: Finished product. The drawing is complete when it's lined, colored and shaded.
TRADITIONAL.
2: To start a drawing, whether it is a character or a scene, you must reduce the scene to fundamental shapes. Abstract the picture you have in mind from everything else, all detail, just make a simple structure to hold them.
3: Start filling the blank shapes with the features that should be present. An advice I can give is to train each feature in a separate page or beside the structures. After you feel like you have nailed the feature separated from the structure, try drawing them on the structure.
4: Do a soft erase, to rid the drawing from the structure lines, but leaving the features only somewhat erased.
5: Bolden the lines you will use. This should make the drawing appear clean on the sheet. If there are imperfections, before stressing over them, consider if they are too "maculating". If they are not, maybe you should just leave them there: excessive erasing could ruin the paper sheet.
6: If you are a traditional artist, you may want to color and shade your drawing now. After you have done that, scan the drawing or snap a picture with a camera. There you go. Since I no longer use colored pencil, I'll just use the regular pencil to color the nose and do some shading.
DIGITAL.
7: Open a program of choice. For this method, the program needs to be capable of multiplied layering, have a paintbrush tool and a paintbucket tool. Import the picture to it.
8: Create a new layer. Set the mode to "multiply" and adjust the layer's opacity. Adjustments in opacity are specially urgent if you intend to use the black color. The multiply mode is needed so we can color the drawing on the new layer without losing the lines that were drawn traditionally. In the GNU Image Manipulation Program, hereinafter "Gimp", layers are located at bottom-right in my window.
9: Zoom in.
10: Select the paintbrush tool and change it's color to the one you want to use. In Gimp, the color selector are those two squares (one black and one white) at the left side of the screen. Click on the black one to select the front color.
11: Trace the area you want to color using the paintbrush. This process can be made easier in Gimp by holding down the shift key, which enables you to draw straight lines easily by clicking, rather than dragging. If you mess up, hit Ctrl + Z to undo the previous movements. The brush can be edited with the tools found at bottom-left in my window.
12: After you have traced the area you want to color, switch from the brush to the paintbucket tool. Click with the paintbucket inside the traced area. This is supposed to fill the entire area with the color. You may need to click more than once. If the color "leaks" into an area it's not meant to go, the area wasn't well-traced. Hit Ctrl + Z, grab the paintbrush and trace again.
13: Trace the next area with the brush and fill the are with the paintbucket.
14: Change colors to trace the next area with the color you want to fill it with.
15: Trace the area with the brush.
16: Fill it with the bucket.
17: Change the color to trace the next area with the next color.
18: Change to the brush and trace.
19: Change to the bucket and fill.
20: Change colors again to trace the next area.
21: Trace with brush, fill with bucket.
22: Change colors again to trace the next area.
23: Trace with brush, fill with bucket.
24: Once all areas are full, remember that we have zoomed. Time to do it again in the areas we have not done.
25: Change colors to the color you want to color the next area with, trace the next area with brush.
26: Fill the area with the bucket.
27: Change colors, trace with brush.
28: Fill with the bucket.
29: Trace the next are with the brush.
30: Fill with the bucket.
31: Change colors.
32: Trace with brush, fill with bucket.
33: Change colors, trace with brush, fill with bucket.
34: Check if there is any area we have not worked yet.
35: Change colors, trace with brush.
36: Fill with the bucket.
37: We are not done yet. Add another layer, set the mode to multiply and adjust the opacity.
38: Change the color to the one you want to shade with. Then, using the brush, trace over the area you want to shade.
39: Fill with the bucket.
40: Verify other areas you want to shade. Trace them with the brush.
41: Fill them with the bucket.
42: Is there any missing areas? Trace them.
43: Fill with the bucket.
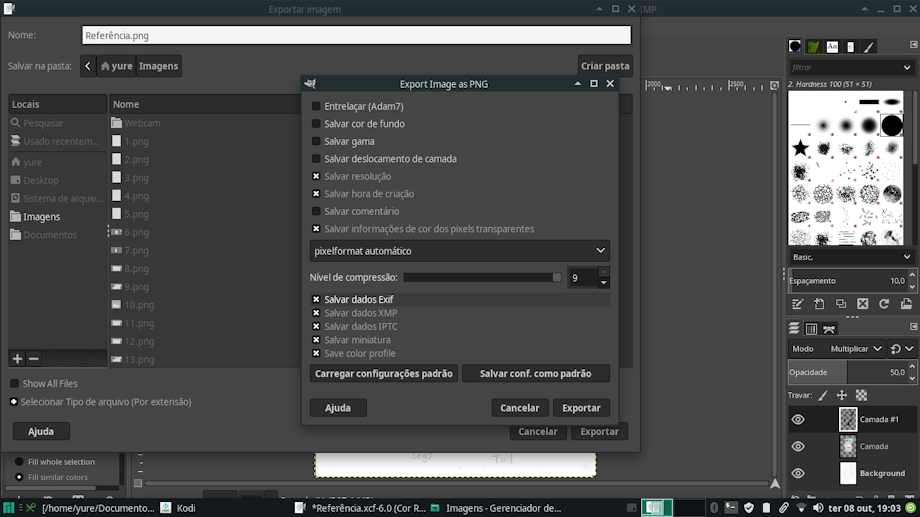
44: Export the image.
45: Touch up the export settings, even though the default is just fine.
Keywords
male
1,247,018,
cub
296,708,
feline
158,482,
diaper
83,124,
study
873,
tutorial
609
Details
Published:
6 years, 1 month ago
09 Oct 2019 00:48 CEST
Initial: 7ae81860c11f828cd33d6503695d1bb9
Full Size: ec0132122c876477cc4068fb4950bbec
Large: 3db782c7b1202dc1b3ae73f0af27fe29
Small: 4e3969bdac3acac94681a1d48f31c3a9
Stats
599 views
26 favorites
15 comments
